


Start with 3 for 3
If you are just starting your ultralight journey, I recommend focusing on your "Big 3". They are your backpack, shelter and sleep system. What a backpack is is hopefully pretty self explanatory. A shelter could be a tent, tarp or a bivy. Hammocks are also a possibility when hiking below tree line. A sleep system consists of a sleeping pad, a sleeping bag/quilt and maybe a sleeping bag liner and a pillow (if you are hammocking, you might omit the sleeping pad and use an underquilt instead).
If you can get your Big 3 to not weigh more than 3 kilos/6.6 lbs, then you have gotten really far in going ultralight. Don't worry if this number seems unattainable right now, just work towards it.
Here are some suggestions on what to look for with these gear items:
1. Backpack. Frame or no frame? Old-school backpacks have a frame which make them more rigid and as such are generally capable of carrying heavier loads than a frameless backpack. However they have two major downsides, one being that they are heavier and the other that they tend not to fit as snugly around your torso. If you are always hiking on well-maintained fairly level trails, shorter hikes or want to carry a lot of extra goodies, then an external frame backpack could work. On the other hand, if you want to hike off-road, walk on varied technical terrain and have the option of hiking longer distances, I would recommend an internal frame pack or a frameless pack. These packs are lighter and hug your torso much more tightly than an external frame pack. So when you are heading up a steep mountain or tackling fallen tree logs, your pack is going to move with you better, giving you better balance. So which pack should you get? Well you need to know what kind of hiking you are going to be doing most of the time. For a dayhike, 20-40 liters is enough. If you need more than 40 liters for a dayhike, I would argue that you are bringing too much stuff. For weekenders, a 40-50 liter pack should work and for longer hikes spanning up to 10 days, a 70 liter pack should suffice. Now, these guidelines are only relevant if you keep your gear to the essentials and not bring a lot of "luxury" items and hike during seasons excluding winter. Here are my packs: *ULA Circuit 4,200 CU IN/68 liters (red/black) *KS 4 2440 CU IN/40 liters (grey/black)


2. Shelter. Again, think about what kind of hiking you are mostly going to be doing. Dayhiking? Not really any need for a shelter, unless there often is a lot of rain and/or wind. In that case, you might want to look into getting a tarp. It is light and works especially well if you hike with hiking poles. Yes, a tarp does demand a little bit of practice to pitch effectively but once you learn how to make an A-Frame and maybe a Half Pyramid, a tarp can be a great option. For hiking overnighters, you can use a tarp or tent (hammocks are not covered here since I don´t hammock, but who knows I might try it someday). A tarp does require more skills in getting a proper setup and is generally more limited in getting adequate coverage. If hiking above tree line using a tarp you have to really know what you are doing. So that leaves us with tents and here you basically have 4 parameters to consider. First, do you want a single wall or a double wall tent? A single wall is lighter but more prone to condensation and is not as warm. A double wall is heavier but has less condensation and is warmer since the inner tent blocks some of the wind and traps your body heat to a higher degree. Secondly, you can choose a trekking pole tent that uses...yes, you guessed it, one or two trekking poles as part of the tent structure to pitch it. Some trekking pole tents can be bought with a dedicated tent pole (often made of carbon fiber to shave weight). This is an option if you want a trekking pole tent but do not hike with trekking poles. These tents are lighter than semi/freestanding tents and the geometry is often some form of pyramid shape. They are often preferred by hikers that like to hike long distances. In this case, every ounce in your backpacks counts! The downside of trekking pole tents is that they require more skill to set up (however with some practice you can get fast pitching these tents as well). They are also dependent on the stakes holding in the ground (which can be challenging if the soil is loose or very hard), so if one stakes rips there is a high likelyhood that the tent will collapse. A semi/freestanding tent will not loose its shape even if it is not staked out (a semifreestanding will to a greater or lesser degree, thus its name). However if there is a lot of wind even a semi/freestanding tent can collapse/blow away without the added stability of groundstakes and storm guylines. The geometry of semi/freestanding tents is more of a tunnel or dome style. They are often easier to set up, there is less tweaking to do to get a good pitch and they have bigger liveable space once inside. A freestanding tent means that it does not need any tentstakes to pitch the tent. This can be a great advantage if you are camping on rock or hard ground. The downside is that they tend to be heavier and they take up more space in your backpack compared to trekking pole tents. Hiking below tree line means you will have less wind so a lighter tent is possible. Conversely, if you plan on hiking at high altitude with higher winds, a beefier tent is required which does mean a heavier tent. So in summary, if you want the lightest possible tent go with a single wall trekking pole tent. If you want a tent that can handle any terrain then choose a freestanding tent. Examples of trekking pole tents are Six Moon Designs Lunar Solo, Tarptent Aeon Li and Gossamer Gear the One. Examples of semi/freestanding tents are Big Agnes Copper Spur HV UL1, Nemo Hornet Osmo and MSR Hubba NX. My tent/tarps: *Six Moon Designs Gatewood Cape, 15 denier silnylon *Tarptent Aeon Li, DCF *Borah Gear Solo Tarp, 20 denier silpoly


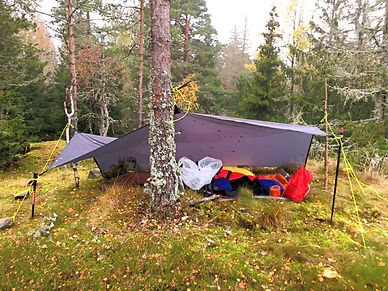


Six Moon Designs Gatewood Cape, top 2 pictures
Tarptent Aeon Li, middle 2 pictures
Borah Gear Solo Tarp, bottom 2 pictures
3. Sleep system. Sleeping bag or quilt? If you want to have the easiest/warmest setup then go for a sleeping bag. If you are not hiking in cold temperatures (around freezing or colder) and/or move around a lot in your sleep, then a quilt could be a good choice. The argument that quilts are lighter than sleeping bags is rarely true and volume is not that much smaller either. I do not use quilts but my understanding is that it primarily comes down to if you want to be able to move around more, then a quilt can accomodate that better than a sleeping bag. A quilt might also be more versatile in that it can open up more or less like a blanket. This way you can cover a wider range of temperatures. A sleeping bag with a full length zipper can behave almost the same as a quilt so I am not sure how much of an advantage a quilt really offers. When it comes to retaining heat (which is what a sleeping bag or quilt is designed to accomplish) I have read quite a lot of comments from people having issues with drafts when using a quilt since it doesn't wrap around you completely like a sleeping bag. The second thing to consider is what type of insulation you want; down or synthetic. Down is lighter, warmer for the same weight and more compressible than synthetic insulation (although the difference is getting smaller). Down also lasts longer than synthetic material which doesn't handle being compressed as well. Synthetic material is better in humid/wet conditions as it retains its properties better than down and it is also cheaper. If you are concerned with the wellfare of the geese in the manufacturing of down bags/quilts, then that could also be a reason to choose a synthetic bag. Many down bags are RDS certified which is a set of standards ensuring that the geese used for producing down bags are humanely treated. For example, live-plucking of down or feathers is prohibited as is force-feeding. In short, choose down if you want the warmest insulation for the weight, the highest compressibility and a product that is going to maintain its function the longest with use. Pick synthetic material such as Climashield Apex if you want warmth in humid/wet conditions or want the cheapest option. Sleeping pad. You can choose an inflateable or a closed-cell foam pad. An inflateable pad is more comfortable and insulates you better from the ground depending on which one you pick. A closed-cell foam pad is more durable and there is no risk of a puncture. If you suffer a puncture and can't repair it, your pad will be pretty much useless resulting in a miserable night's sleep. That being said, I have used an inflateable pad for many nights and have not any issues. A closed-cell foam pad is often lightweight but can be quite bulky. An inflateble pad suitable for summer hiking can compress down to a very small size. Many hikers use an inflateable pad as their primary pad and supplement with a foam pad for added ground protection and insulation when needed. In short, choose an inflateble pad if you want the highest sleep comfort and the possibility of excellent ground insulation (which is needed if you hike during shoulder seasons, winter and/or hike at higher altitudes). Grab a closed-cell foam pad if you want high durability at a low cost while also not having to worry about punctures and do not mind sleeping on a relatively hard surface. Sleeping pillow. Here you can choose from inflateables (such as Trekology or Sea to Summit Aeros), foampillows (for example Thermarest Compressible Pillow Cinch) or a stuff sack pillow (check out Hyperlite Mountain Gear). The advantage of an inflateable pillow is that it takes up very little space when deflated and the weight is low. The only reason I would consider a foam pillow is if an inflateable pillow just doesn't cut it comfort wise. The idea behind a stuff sack pillow is that you use a stuff sack that is shaped as a pillow and stuff it with perhaps a puffy jacket and/or other soft clothing to create a pillow. I like the multiple use concept, however if you need to use all your clothes while sleeping (this has happened to me several times), then you have nothing to stuff you stuff sack pillow with. So for this reason, I have yet to try this option. Sleeping bag liner. This is of course optional, advantages being that it protects your bag from dirt, sweat and skin oils. It also helps to prolong the life of your sleeping bag. It may also add a degree or two of heat retaining capacity. Liners are usually made of cotton or silk. Silk is lighter but more expensive. I personally avoid cotton (also applies to all clothing used when hiking) since it dries slowly if it gets wet.


Pajak ULZ, yellow sleeping bag
Western Mountaineering Summerlite, red bag
Thermarest Neoair Xlite, yellow sleeping pad
(links to Neoair Xlite NXT which is the latest version)
